
Astrophotography Guiding
By Paul Albers
Over time it becomes obvious the combination of collecting good data and processing skills is the right equation for obtaining a good final image. “Autoguiding” is one method that will improve your results immensely.
Simply put, Auto-guiding is an automated, computer based, closed feedback loop that allows a mount to track an object very precisely for long exposure imaging.
You can read any good book on astrophotography and the same messages are apparent.
Noise generated by the CCD/CMOS chip of your camera is the biggest problem that faces many astrophotographers. And good “Signal to Noise ratio” (S/N) is paramount when collecting good data for your images.
In this article I will discuss the benefits of “Auto guiding” when imaging. Not only will it improve the signal to noise ratio, it will allow you to image a greater range of deep sky objects. Also there are links to follow for further reading and basic programs you can access to get you started.
Good “Signal to Noise” ratio is when the data collected by the camera gathers more signal, (good data) than noise, (bad data) over time. The longer the exposure the better the “signal to noise” ratio!
In other words, if you take a 30 second Sub (exposure) you will have collected an even amount of signal compared to noise. Let us say you now take a 5 minute sub, the ratio will increase dramatically in favor of the signal collected compared to the noise. Guiding allows you to take longer Subs and as a result improves the S/N ratio and by taking longer exposures allows you to gather more light from those deep sky objects normally harder to image.
As with all electrical devices the components heat up over time, CCD and CMOS cameras are no exception. “Thermal Noise” and “Amp Noise” are all expressed by “hot pixels” on your image, leaving a green, blue and red spotted result. There are many ways astrophotographers can remedy this problem either taking many Subs and randomly mixing the noise, use a “Master dark” to subtract the “hot pixels” and finally process the noise out with a Photoshop add on called “Noise Ninja”. All do a good job, but one can argue obtaining a good image to start with solves half your problems.
One fundamental component for astrophotography is the Equatorial Mount. These mounts range from the basic to the more advanced. These mounts all suffer from what we call “Periodic Error” or “PE” for short.
“PE” is when the drives, gearing and meshing of the mounts components aren’t perfect. The result being the mount’s tracking is compromised by slipping and jumping because of the mechanical impurities.
The “PE” of a given mount limits the amount of time allowed to take a single sub. The star will become elongated and lose its spherical shape. Even with excellent polar alignment you can be restricted to a maximum of 2 minutes. Not good when you want to achieve a good signal to noise ratio! Autoguiding will help solve this problem and the manufacturers of these Equatorial mounts have added a very important computerised interface to assist us.
The Basics
There are three methods used when “autoguiding”.

- Using a CCD with a built in guider.
- Applying an “Off Axis Guider” along the optical train.


- The employment of a second telescope with a guide camera.
The third option shown here is the most taxing on your mount. The second telescope and guider (using either a side saddle plate or mounting the second telescope on top of the imaging telescope) creates extra weight that requires a heavy duty equatorial mount.
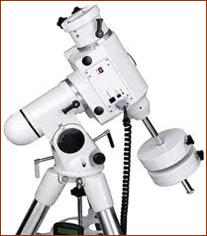
The NEQ6pro is capable in this illustration but it is almost at its limit.
So before you consider purchasing a setup for imaging think about the equipment you may need and most importantly the equatorial mounts capabilities.
How Autoguiding works
A CCD auto guider constantly makes short exposures to take a picture of the star. With the aid of a program like “PHD”, the auto guider calculates its position, monitors the movement of the guide star, calculates the necessary correction to bring the guide star back to its original location, and then issues commands to the telescopes equatorial mount to make the correction. The camera can be a simple monochrome CCD like the Orion “Star Shoot” or a complete package like a “SBIG” which has a guider and CCD in one unit.


There are many programs available but nothing is simpler to use than “PHD”. Free to download from this site
http://www.stark-labs.com/phdguiding.html
PHD is an all in one package. Easy to install and connect to the camera, it comes with drivers for the guide cameras available today. Once PHD is operational it is advised to download the “PDF” file listed below.
This file will help you setup and connect your camera correctly and get you started.
http://www.stark-labs.com/craig/articles/assets/AutoGuiding%20Craig%20Stark.pdf
A Basic Guiding Setup

Here is a good example of a diagram illustrating how to connect the auto guider using a second telescope. With off axis guiding the “Starshoot Autoguider” (SSAG) is connected before the imaging camera and connected in the same method.
The second telescope used for guiding doesn’t need to be optically advanced. An 80mm refractor is large enough. I use a Saxon ED80 and have had no problems finding a guide star.
The guiding program “Phd” runs in the background while you control your camera. You can monitor the corrections made by the program too.

There are adjustments you can make to prevent over correcting and to “Twig” the accuracy of the guiding being preformed.

Some alternatives

Orion has developed and modified their “Finder scope” so to accept the SSAG through the eyepiece. This is a way to avoid the use of a second telescope and the mounting, but you sacrifice the ability to find a good guide star due to its 50mm lens.

Skywatcher and Celestron have released a stand alone system which only requires a guide scope. The computer is internal and connects directly to an equatorial mount.
A Simple Comparison

This image was taken unguided. 40 x 30 second subs, a total of 20 minutes of data using the ISO setting @ 6400.
Notice the lack of detail compared to the image underneath. Remember the longer the exposure the better the data you collect and the less noise is evident within the image.

This image was taken with the same setup but with guiding. Due to the long Sub of 300 seconds the ISO was set at 800. This image is a total of an hours worth of data. Because the ISO can be set low the hot pixel noise generated is far less compared to an ISO of 6400.
That’s another advance over unguided imaging! You can gather enough data with a low ISO setting with longer exposures without the noise.
Some inherent problems with auto guiding and their solutions
- When using an “off axis guide port” Focus can be hard to achieve:
- Spacers can remedy this problem.
- The “OAGP” may physically interfere with the optical train too.
- When using a “Side Saddle Plate” flexure occurs when the guide scope and main scope move slightly relative to one another; the amount of movement needed to ruin an image is very slight. Using a short focal length telescopes and keeping the exposures between 3 ~ 10 minutes solves this problem.
- Cable management is also important. Once you enter the realm of astrophotography you will be surprised to see how cables tend to accumulate and tangle, Just ask Steve Mohr J Cable management is vital to the prevention of damage to both cable and equipment.
Overall the benefits out weigh the disadvantages! The results are staggering and you will be surprised how easy it is to get going.
Most people who do astrophotography also guide so there are plenty of people willing to help and advise you.
The costs do vary, used quality equipment can be a good secondhand option. But look around before you consider your purchase and ask plenty of questions.